SideKick Tech
Manual
On the left you will find the most common problems that may arise
with your processor. Most are easily remedied. However, if you are not able to
troubleshoot your particular problem, call Phototherm Tech support, Monday-Friday, 8:00am
to 4:30 Pm EST (609) 396- 1456 or Fax (609) 396-9395. You can also Email us at serve@phototherm.com or go to our web sight, www.phototherm.com, and post a message on the message
board.
|
Under Developed Looking Slides
If your slides are coming out under developed or
"dark", either your temperature is to low or your first developer is weak or
diluted
1. Make sure that you are not "flooding" from the
processing drum. If during the process the drum starts leaking chemistry, causing it to
build up in the area underneath, a contamination is occurring in side the drum. One
chemical is being loaded on top the previous solution, causing the newly loaded chemical
to weaken . If this condition occurs, the processed film will almost always come out dark
or magenta.
Check to document on "Flooding at
Drum" to correct this problem
2. If you are not flooding, make sure the temperature is
correct in the heating chamber. Run a "Calibrate Temp" from
the unit
3. If your temperature is correct, remix first developer
Back
Leaking At Drum
Flooding at the drum, (excessive dripping at
spindle area),is cause by one of two reasons:
1. Level sensors set to high
2. Improper Draining
First check your level sensors for proper
adjustment. This procedure is explained in your Manual.
If the levels appear to be correct, check your
dump and save (if used) lines. If lines are run incorrectly, they will restrict the flow
of solution from the processing drum, causing a incomplete drain.
This in turn will leave solution I the drum
thus off setting the capacity of the drum.
First make sure that the ends of the lines are
not under liquid. (Lines are extending to far down in the dump or save containers)
Remove your dump line and replace it with a
very short piece of tubing, about 18 inches, and let it dangle over a bucket. Take your
largest processing drum and remove the top and insert it in the machine. Fill the drum
with water and select " DRAIN " from the plus button on the machine. Repeat this
process 4 to 5 times. If the processing drum drains completely at the end of each drain,
then the problem is in the way the dump line is run. If the drum does not drain
completely, the problem is internal. Something has become lodged in the valve assembly
inside the machine. The valve must be disassembled and cleaned out.
Look in the manual for the location of the
valve assembly inside the machine. Remember:
UNPLUG MACHINE AND COVER CIRCUIT BOARD
Back
Flooding from Overflow
Water coming out of your overflow port in the
rear of the machine is caused by a restricted flush line.
Check Manuel for proper installation
Back
Machine does not move from "Heating
Preheat" or "Heating Developer" in
E6 or C41
If when you first start an E6 or C41 process, the machine does not
move from "Heating Preheat" or "Heating Developer", check the status
of the display. If the display is bouncing back and forth from "Heat on" to
"Heating Preheat" or " Developer ", add 2 ounces of the hottest tap
water you have to the heating chamber. You can access it from behind the black door on the
right hand side of the machine. If the machine suddenly continues on with the process,
this indicates a bad heating chamber and must be replaced.
If the display is indicating one message "Heating Preheat"
or " Developer", the selector valve has not successfully made it to its next
port. If you have a Linear Selector valve,(13 stainless steel tubes) you must run the
"Lube Cycle" about 3 to 4 times. If after lubing, the problem still exists, call
Tech Support at PhotoTherm .
If you have a Rotary selector valve,(circular plastic) you may have
gotten chemicals on the timing wheel and the selector valve has lost its position. Open
unit and inspect the cut aways on the wheel for evidence of any chemical build up. Gently
rotate the wheel and use rubbing alcohol and any ridged object to clean of the chemicals
in the cut aways
If the problem still exists, call Tech Support at Photo Therm
Machine wont Initialize-Stuck in
Process
Linear selector valve
If the SideKick wont initialize or is stuck in
a process, and you have a linear selector valve,(13 stainless steel tubes in the rear of
the machine), your selector valve is jammed.
You will need to purchase a can of spray
silicone.
On the right side of the unit, towards the
rear, is a circular plastic cap.
Remove the cap and spray the silicon into the
cylinder area of the selector valve. Let set for 10 minutes. Try turning the unit on and
see if it will initialize.
If it does not, repeat the process.
If you are successful, Run the lube cycle 4 to
5 times.
If the machine still will not initialize, call
Tech Support.
Machine wont
Initialize-Rotary selector valve
If the SideKick wont initialize and you have a
rotary selector valve,
(circular with 18 tubes), the most common cause
is chemical build up on the sensor wheel located inside the unit causing it to loose
position.
First open the machine and remove the rotary selector valve. Carefully disassemble the valve and clean the
wheel and face plate with hot water and soap. Concentrate on cleaning the cutaways on the
sensor wheel, located under the triangular pressure plate.
USE ONLY A PAPER TOWEL TO CLEAN PARTS WITH,
NOTHING ABRASIVE!
Reassemble the selector valve and mount it back
on machine.
Turn unit on. The machine will position the
selector valve automatically
Machine Failure
If the machine indicates machine failure, this
usually indicates a bad temperature sensor, a part which can be ordered and installed with
ease.
Back
Muddy Looking Slides
If your slides have a "muddy" look to
them, this is from under bleaching. To eliminate other causes, try, in 7 step
chemistry, rebleaching your film, in 4 step reblixing. Roll the processed film back on a
reel and place the reel in a small container. Fill the container with enough fresh bleach
or blix to cover the reel. Let sit for 10 minutes. Remove from the container, wash the
film off and dry. If the film clears up, remix the bleach or blix.
If rebleaching had no effect on the look of the
film, call phototherm tech support.
Back
Chemicals are not picked up by
Level Sensors
If the machine will not stop pumping up solution into the heating
chamber,
and there's evidence of solution coming out the flush line, you are
using distilled or deionized water, which must be changed to regular tap water, or the
heating chamber has lost a ground wire from underneath.
To see if this is the case, make sure the heating chamber is full of
water.
Select "Drain" from the plus button, then press start. If
the pump stops before the heating chamber is empty, the ground wire, a green wire that is
soldiered on the underside of the heating chamber to the metal base, has come off.
Resolider the wire in the exact spot from which it came off, and retest.
Back
No Display
The display on the unit is written to independently and has no effect
on the machines performance. If the display goes out or you experience garbled wording,
the display most likely needs to be replaced.
Back
Not Recognizing Drum- SK4
The most probable cause of the SK4 not
recognizing a drum is a faulty sensor mounted in the unit. For the four roll drum, the
sensor is mounted above the heating chamber to the side of the body. The two roll sensor
is mounted on the opposite side of the machine on the side also.
These parts can be ordered and easily
installed.
Back
Not Recognizing 8 Roll Drum-SK8
If the SK8 does not recognize the drum, first
clean the contacts on the machine and the drum. Gently push the contacts together on the
machine.
Insert the drum and try again. If the drum is
still not recognized, try inserting the other drum. If the machine operates properly, the
problem is with the one drum. Usually this means the sensor inside the drum has failed and
the drum needs to be replaced.
If neither drum is sensed by the machine, a
problem exists with one of the wires attached to the back of the contacts inside the
machine.
Open the unit and inspect each contact from the
inside.
On one contact you will find a red wire, and on
the other you will find a green.
Make sure both wires are tighten to the
contacts, and that they are not touching each other.
If all the above seems good, call the tech
support at Photo-Therm
Back
Rotation Motor Stops
The most common cause of a rotation motor stopping is bent pins on
the spindles, causing the spindle to bind against the processing drum.
To test, start a "DUMMY" process, ( no film in processing
drum).
When the motor starts to rotate slowly or stop, pull back on the
processing drum until the spindle disengages from the staple bushing.
If the motor picks up speed, the problem is with the pins on the
spindle.
If there is no change in the motor speed, it must be replaced.
Call Photo-Therm to arrange to have the pins on the spindle repaired.
Back
Spots on Film
There are several causes of film spotting. The
most common is stabilizer or photoflo that is over concentrated. Small bubbles form and
dry on the film causing spots. If, after you process, notice bubbles or foam on your film,
this is an indication of over concentration.
1.Cut the mixing ratio of your stabilizer or
photoflo by half. ( one half on concentrate to recommended water)
2.Check your areas water supply. Some areas
have a high level of calcium. Calcium will leave small spots on your film. Rinsing the
film under water and using a rubber wiper will help.
3.If your using the dryer on the sidekick, you
must leave the reels on the spindle when drying. If your putting only the reels in the dry
tube, the air flows through the center causing uneven drying and spotting
Back
Streaking in the End Frames
Streaking in the end frames is due to insufficient chemistry
in the processing drum. This can be caused by several different factors: incorrect level
settings in the heating chamber, a slow leak from the valve assembly, or having your unit
unleveled.
1. Check your level sensors for proper adjustment. Refer to
your manual for the procedure.
2. If your level sensors are set correctly, remove your dump
and save tubing from the back of the unit. Insert the largest processing drum in the unit,
with no lid and a spindle with a reel on each end in place. For a FP1 or Sk4 processor,
pour in 14 oz of water. For an Sk8, pour in 29 oz. Inspect the height of the water
in relationship to the center of the front reel and the back. If the water appears
to be higher in level on one reel as opposed to the other, the machine is not "true
level" and must be shimmed on one side to equal the level for both reels.
3. If after pouring the water in the drum as directed in
step 2, you find the water level is equal on both reels, let the drum sit for about
10 minutes. During that time, check for dripping from the dump or save stainless steel
tubes in the back of the unit. If dripping occurs , the valve assembly must be removed and
cleaned. Usually a foreign object has lodged itself inside keeping the valve open slightly
causing a slow drain during processing.
If you still have problems, contact PhotoTherm tech support.
Back
PhotoTherm
Super Sidekick
Film Processor
Model SSK-8R
8 Roll Auto Replenishing
Owner’s Manual
US PATENTS RE 34,188 & 5,379,086
Please record the Serial No. ____________ and date of Purchase __________
Please mail in your warranty card.
TABLE OF CONTENTS
2 Description |
11 Test Mode |
18 B&W Dev. Times |
2 Setting up |
11 Diagnostics Mode |
19 4x5 processing |
5 Preset Selections |
12 Maintenance |
20 Automatic Replenishing |
6 Processing |
13 Alarms and messages |
21 Service–Correcting Problems |
7 Drying |
14 Hints |
24 Parts list |
8 Reel loading |
15 Process Parameters |
25 Wiring |
9 Special functions |
17 Chemicals |
26 Phone #’s & Log |
| 9 Normal Mode |
17 Other Processes |
|
| 10 Program Mode |
18 Push Processing |
|
WARRANTY
Each PhotoTherm product is produced under rigid quality control standards. This unit is
fully warranted for a period of one year from date of purchase. PhotoTherm 110 Sewell Ave
Trenton NJ 08610 USA Tel 609 396-1456 Fax 609 396-9395.
110 Sewell Ave. Trenton, NJ 08610 USA Tel 609 396 1456 Fax 609 396 9395
Email serve@phototherm.com
DESCRIPTION
The SSK-8R automatic processor accurately tempers each solution, one at a time. This
design breakthrough allows B/W processing at 75 oF and then immediately
afterwards slide processing 100 oF. Tempered water is not needed. Long warm-ups
are not required.
All the solution bottles for processing color slides, color negatives and Black and
White negatives are constantly connected. The operator just selects the process. The unit
pumps the proper chemical from any of the 18 reservoir containers, quickly heats the small
volume needed to the correct temperature and starts processing. As it processes one
solution it prepares the next solution. At the end of the process cycle it automatically
flushes itself clean, preparing itself for the next process.
Back
The SSK-8R is compact (26" wide by 14" high by 16"
deep). The process drum is removable for loading in a dark box or
bag. The SSK-8R can process 8 rolls of 35, 5 rolls of 120/220 or 8 sheets of 4x5 at one
time. Two chemicals can be automatically saved from each process for silver recovery,
reuse or automatic replenishment. Fresh developer is used for quality. The standard
processes are pre-programmed, but the developer time can be easily changed when desired.
Back
The SSK-8R can be set up for any of 4 slide, 4 color negative and
3 B&W processes. The
operator can change the time of, or eliminate any process step. The operator can select
which solutions to save. The SSK-8R anticipates problems and takes automatic corrective
action.
The SSK-8R protects the film from possible operator errors. It has an interactive
computerized display that prompts and informs the operator what it is doing. Possible
operator errors are also minimized because, chemical lines do not have to be switched nor
must volumes of solutions be measured.
Back
SETTING UP THE UNIT
| ... 8-reel and a 4-reel black
processing drum with lids ... 8-reel and a 4-reel spindles with impellars.
... 10 plastic film reels
... Main processor SSK-8RG
... Spacer 2-roll (white fat donut)
... Utility dryer tube. (White plastic 4" diameter 11" long |
… Dryer spindle. (10"
long without an impeller) ... Coil of �" flexible tubing
... Power cord
... Six � gal. (2 liter) solution bottles with fittings
... Six 1 gal. bottles
... Two 1 gal Holding bottles
... 10 Film Clamps for 120/220 film.(white curved plastic pieces) |
... Two 1 gal. collapsible
bottles ... Water bottle (5 gal) with float valve
.. Saddle valve kit to connect water bottle to water pipe
... Dump bottle (5 gal) with level sensor and cap with
…3" gray plastic fitting to hold the dump and flush tubing
... Plug to seal COUPLING when FLUSHING |
... Syringe of silicone grease ...
Allen wrench (1/16") for bushings
... Magnetic stirrer. A white "pill" (3/8" x 1")
... Permanent marker
... Piece of Scotch Brite
... Set-up video
... This instruction book |
Back
Place the unit on a flat level surface. Lift up the side and cut away and discard the
two visible nylon straps from the bottom of the unit. These straps hold the pumps secure
for shipping and must be removed for the pumps to work.
Prepare the solution bottles. a) Loosen NUT. b) Push in notched end of the � OD black
tubing through fitting to bottom of bottle. Leave about 2 inches (5 cm) exposed. c) Hand
tighten nut. d) Rinse out bottle. You can use the collapsible bottles for developers; they
will extend chemical life because there is no air interface.
Use the marker pen to label each bottle and lid with the chemical it contains. Cut a
piece of clear flexible tubing long enough to run from the bottle to the back of the
machine. RUN THE TUBING STRAIGHT DOWN from the back of the machine. After about a foot,
the tubing can run in any direction Allow about 2 feet (60 cm.) extra for slack. Label
both ends of the tubing with the chemical name. Slip one end over the proper tube and the
other end over the exposed black tubing of the solution bottle. The 5 gal. Water bottle
connects to the WATER (#5) tube.
IMPORTANT. The solution source bottles must be located below the processor.
The 5 gal. water bottle, which has a float valve near its lid, holds the water that
will be used for processing and internal cleaning (FLUSHING) of the unit. You can manually
fill the bottle. Use regular tap water, not de-ionized or distilled water. You can connect
the bottle to a cold water pipe for automatic filling with the "ice maker" kit.
TURN OFF THE WATER AT THE SOURCE WHEN THE MACHINE IS NOT IN USE.
The DUMP bottle comes with a level sensor that should be plugged into the DUMP SENSOR
jack on the back of the unit. IT WILL SENSE IF YOU HAVE ENOUGH ROOM FOR A 2 or 4 ROLL RUN
ONLY. The bottle must be emptied if you are doing a 6 or 8 roll run. If a plumbed-in drain
is available, use it.
There are five drain outlets in the back of the unit:
1. DUMP - For spent chemistry. Connect to DUMP bottle or plumbed-in drain.
2. FLUSH - Disposes of spent FLUSH water. Connect to DUMP bottle or drain.
3. SAVE FIX - Recovers the solution to be saved. Active only when SAVE
switch is on (red is showing). Connect to separate bottle.
4. SAVE BLEACH - Recovers solution to be saved. Active when SAVE switch
is on. Connect to separate bottle.
5. OVERFLOW - DO NOT CONNECT. If solution comes out of this outlet, check
your FLUSH tubing for proper installation.
Push the flexible tubing over the stainless tubes of these outlets (not more than
3/4").
Very Important
Position DUMP bottle close to unit. (Fig. 1)
Run tubing directly to DUMP bottle. (Fig. 1)
Cut off unneeded length of dump tubing. (Fig. 1)
Run the DUMP and the FLUSH tubing separately into the 3" gray fitting on the DUMP
bottle. Do not put a third tubing into the same fitting. Do NOT run tubing inside DUMP
bottle. (Fig. 2). Allow at least 12" drop between unit and DUMP bottle.
Open the DOOR by lifting up from the bottom and pulling out. Place the magnetic stirrer
(white pill) in the exposed heat tank. Carefully push the stirrer with a pencil until it
is magnetically caught near the back right corner of the tank. Turn SIDEKICK on and check
if the stirrer is turning.
Put in six Alkaline "C" Cells in the battery holder. This will allow the unit
to continue after a power failure and protect it against power surges. Plug the power cord
into a 120 Volt AC 15 Amp. (regular domestic) outlet.
The batteries will protect SSK-8R from short power losses. You can also connect SSK-8R
to a TRIPP Model Pro 1400. A 1400 Watt Uninteruptable Power Supply, which would allow the
unit to finish the process in case of a long power failure.
PROGRAM the USER CODE. You have to program the user CODE before
you can use SUPER Sidekick (SSK). This is only done once.
Turn off SSK for at least 10 seconds. Hold down the START switch as you turn SSK on.
Release the START switch. SSK will show the programming instruction. (See PROGRAM MODE for
a fuller explanation). SSK will then display "USER CODE" " # (any
number)". Change the number by pressing – ( MINUS) telling SSK you want to make
a change. Then pressing PLUS(+) to increase the number. When "7" is displayed,
press START. SSK will record the information. After it is finished "RECORDING",
you can use PLUS to look through all your options or just turn SSK off.
Make sure SSK is level by inserting the bottom half of the large DRUM in the SSK. Pour
water into the DRUM until it is about �" from the top. Measure the distance from the
water to the top of the DRUM at the front and the back of the DRUM. Level the SSK with
shims until the distances are equal. Run DRAIN to empty the DRUM. See SPECIAL FUNCTIONS.
See PROGRAM MODE to select the set processes. Run the DUMP TUBING TEST to verify
correct tubing installation. See TEST MODE.
Back
PRESET SELECTIONS
Selections as shipped from the factory. See PROGRAMMING to change selections (values).
Name |
Preset |
Choices |
| Unit Code |
0 |
Must be changed to 7 to operate. |
| Replenish Percent |
00% |
|
| Slide Dev Time |
6:30m |
|
| Color Neg Dev Time |
3:15m |
|
| TriX/PlusX Dev Time |
4:40m* |
|
| Tmax 100/400 Dev Time |
5:30m* |
|
| Tmax 3200 Dev Time |
5:45m** |
|
| Dry After Process |
No |
Yes, to use built in dryer |
| E6 Slide Process |
4 Step |
7 Step, with or without prewet |
| Color Neg Process |
C41 |
Bleach+Fix, with or without prewet |
| Set all Times |
Standard |
Change any time as needed |
| Save as Bleach |
None |
Any solution |
| Save as Fix |
All Fixes |
Any solution |
| Rotate RPM |
40 RPM |
10 to 50 RPM (Rotations/Minute) |
* 75oF (23.9oC) ** 85oF (29.3oC)
PROCESSING
In a dark box, load the film on the reel (see REEL LOADING). Slide the reel on the
spindle with the film guide pointing in the direction shown. If there is room on the
spindle, use the SPACER (goes on last) to conserve chemistry. Place the spindle inside the
FILM DRUM. Cover the spindle with the lid (one side is shaped to go over the spindle).
Slide the clips towards the ends of the FILM DRUM to close it. You are now light tight.
Push the FILM DRUM to the left in the TROUGH till the SNOUT seats itself inside the
COUPLING. The two stainless pins of the spindle should go on opposite sides of the STAPLE
on the rotate motor.
Look to make sure you have enough solution in the chemical bottles. Empty the DUMP
bottle. Turn the unit ON. Use PLUS to select the type of film you are processing. Push
START to begin the process.
The unit will ask you how many rolls (35 mm) are being processed. Use "PLUS to
select : "2" for 1 or 2 rolls of 35mm or 1 roll of 120/220. Use SPACER.
"4" for 3 or 4 rolls of 35mm, 2 rolls of 120/220 or a 4x5 sheet film holder.
"6" for 5 or 6 rolls of 35mm, 3 rolls of 120/220 or 2 4x5 holders (8 sheets).
Use SPACER
"8" for 7 or 8 rolls of 35mm, 4 or 5 rolls of 120/220.
The SSK uses 2 oz. (60ml) of solution per run, plus 3 � oz. (105 ml) per roll.
If you want to change the developing times see PUSH PROCESSING.
The unit will load the first solution into the internal heating tank, heat it to the
proper temperature, warm the processing drum with warm air and then start the process
automatically. As the unit is processing one solution it prepares the next solution. The
film DRUM has an independent secondary temperature controller that controls the warm air
blowing on the DRUM to maintain accurate temperature. The temperature in the DRUM is
continuously measured and the time slightly adjusted for a final tweak of the processing.
This fine tunes the solution to an accurate temperature for very consistent results. When
one solution is finished it is drained out and the prepared solution in the heating tank
is pumped into the DRUM. The same procedure is repeated for all the necessary solutions.
The unit will signal at the end of the wet processing. Remove the PROCESS DRUM. Insert the
PLUG in the COUPLING and wipe out the TROUGH with a paper towel.
Back
DRYING
Up to 4 rolls of 35 mm film can be dried in the included UTILITY DRYER on reels. The
film can also be dried any other way. The base of 120 film is too thin for drying on a
reel, and must be dried by other means.
Place the UTILITY DRYER vertically in the TROUGH so that the cut away portion of the
DRYER covers the air vent in the side of the TROUGH. Shake out each reel 4 times over a
sink with a vigorous snap of the wrist to remove excess solution. Put the reels on the
dryer spindle (closed end on the bottom) and put the spindle in the UTILITY DRYER
Push START to begin drying. SSK will FLUSH itself as it is drying the film. The unit
MUST BE ALLOWED TO FLUSH itself after every processing run. The required drying time will
vary with the amount of film and the relative humidity of the room. If the film is not
fully dry when the dryer stops (15 min.), dry again. Rinse all reels, spindle and drum
with COLD water. Room air dry - hot air may distort the parts. RINSE, DO NOT IMMERSE THE
DRUM.
If you get drying marks, try the following: a) use distilled water for the last step.
b) dilute the wetting agent or stabilizer. c) use softened water. d) rinse externally in
distilled water. e) squeegee and hang up to dry. Film with drying marks can be re-rinsed
and dried again.
An accesory hang-up dryer is available from PhotoTherm (Part# AF-DR8).
Back
REEL LOADING
The plastic ratcheting reels can be adjusted to hold different sizes of film. Simply
hold the reel in both hands, making sure that the outer spiral groove (near the ball
bearings) is on top and facing you.
Twist the right half of the reel clockwise until you hear a click. The two halves can
then be pulled apart. There are 3 "keyed" positions on the reel hub. The
narrowest position is for 35mm or 126, the second for 127, and the widest for 120/220.
Insert the leading end of the film, emulsion down, into the outer spiral groove of the
reel and an inch past the ball bearings. With both hands on the reel twist the right half
and the left half in opposite directions. You may have to assist the film feeding by
placing the thumb, of your forward moving hand, on the outside of the film.
Keep feeding the film until the end clears the ball bearings.
Any Paterson TM reels will work. They are available at most photo stores.
Contact Photo-Therm if you prefer to use different style reels.
35 MM FILM Cut off the film leader. Clip the corners of the leading end to make feeding
easier. 35 mm film can be started past the ball bearing in the light, but must be fed into
the reel in the dark. Twist one side of the reel back and forth to feed the film into the
reel. When you reach the end of the film use scissors to cut it away from the film
cassette. Do not tear the film. An uneven tear may cause the film to come off the reel.
Back
120/220 film comes off
during process
120/220 FILM. Separate the tape from the backing paper and fold it back over the film.
This will stiffen the end of the film. Load the taped end into the reel. Feed until the
back end passes the ball bearings.
Bend a 120 Film Clamp and place it over the end of the film into the grooves of the
reel, close to the ball bearings, as shown above. Add a second film clamp on top of the
first one. For extra assurance use a 1 in. piece of leader tape to bond the end of the
film to the film clamp.
Mount the 120 reels in the center of the spindle.
SPECIAL FUNCTIONS
Just turn the power switch ON for normal operation. Hold down the START switch as you
turn the power switch ON to be able to PROGRAM process values. Hold the PLUS switch when
turning on to see the roll count and run DUMP tubing test and valve test.
Hold MINUS when turning the unit on to put SSK-8R in DIAGNOSTIC mode.
MODE |
Hold when switching ON |
Description |
NORMAL |
Nothing |
Normal Operation |
PROGRAM |
START |
Changes processes and set values. |
TEST |
PLUS + |
Tests Valves and DUMP lines. Displays Roll
count. |
DIAGNOSTICS |
MINUS - |
Technical diagnostics. |
NORMAL MODE Special Functions
Selected with PLUS when machine is turned ON.
DRY will turn on drier for 15 minutes.
DRAIN will empty the internal HEAT TANK and the PROCESS DRUM.
CLEAN LINES is a major cleaning. It draws solution through each
of the chemical tubes, one at a time, starting with tube #18 and ends with #1 and then
does a FLUSH using #5 as a water source.
All solution tubing should be removed and the water tubing moved manually from position
to position, as the unit draws water through each tube to clean itself.
Back
CALIBRATE will load water into the heat tank, heat it and hold
the temperature at 37.8 oC (100 oF). The unit will emit a beep every
time it reaches the proper temperature. Allow 15 minutes after the first beep before
reading temperatures. Check the temperature with a digital thermometer (an electronic
fever thermometer works great) with the probe near the stir rod but not touching the
bottom of the heat tank. A glass or dial thermometer will not work. CALIBRATE also
measures the number of pump pulses needed to cover the level sensors. This information is
necessary for replenishment with the SSK-8R. If you run out of water during calibration,
rerun the calibration.
The temperature can be adjusted with a small screwdriver through a hole on the left
side of the unit. Clockwise to decrease temperature. All units are calibrated at the
factory and should not need adjustment in the field.
Back
The DRUM Temperature sensor can be tested by holding MINUS when
"CALIBRATE" is displayed and then pushing START. The bottom display line shows 2
Hex numbers. The first Hex number refers to the DRUM temperature sensor. At room
temperature (70 oF, 21 oC) the Hex number should be B5,B6,B7,B8,B9
or BA. The important thing is that it should not vary by more than 2 on any successive
reading. If it readings are erratic, clean the Stainless Steel contact plates with alcohol
and Scotch Brite, and squeeze in the contactors on the body.
Back
PROGRAM MODE will allow you to change the set processing values. Select by holding
START as you turn SSK on.
SSK will first show you programming instructions.
Use MINUS when you want to change settings. Minus will also lower the time when
changing times.
Use PLUS to advance the selections and increase the settings.
START records the changes.
Turn the power switch off to exit programming.
Change # to 7 for the unit to operate. Push MINUS to make a change. Push PLUS until 7
is displayed and then push START to record the change. This is only done once when you
first get Super Sidekick. After recording either turn off the unit for at least 10 seconds
to exit or push PLUS to look at the next parameter.
Changes the percent of replenishment. Push MINUS to change. One number at a time will
start blinking. Use PLUS to increase the number. Push MINUS to move to the next number.
When all the numbers are correct, push START to record.
The next few screens let you change the set developer times. (Changing the developer
time for one processing run only (Pushing), is done during normal processing as the
process is selected.)… push MINUS to make a change, use PLUS and MINUS to select the
time and then push START to record.
If you want to use the included utility dryer right after processing, set to
"YES". If you will dry the films externally (recommended), set to
"NO".
Select the slide process you want to use: whether 4 or 7 step, with or without prewet.
You can also choose not to show slides as a selection to the operator.
Select the color negative process you want to use: C-41 or bleach & fix combined,
with or without prewet. You can also choose not to show color negatives as a selection.
You can change the time of any step in any process. You can remove any step by making
the time less then 2 minutes. In Black & White any changes after developer affect all
the Black & White processes. Push MINUS to make changes, push PLUS to select the
process, then push MINUS to change the times in that process. PLUS selects the solution,
MINUS will let you make changes and then PLUS and MINUS change the time. START records the
selection. Exit by turning Super Sidekick off.
Select the solutions you want to save to the BLEACH SAVE and FIX SAVE tubes. Push MINUS
to make a change, push PLUS to select the process, then push MINUS to change the solutions
you want to save in that process. PLUS changes the choice (Yes or No) and START records
the change. Exit by turning Super Sidekick off.
You can change the rotational speed of the spindle. Push MINUS to make a change. PLUS
will advance the selections and then START will record the changes.
Will change all parameters to their original settings when Super Sidekick was shipped
from the factory. Just press START.
TEST MODE Select by holding PLUS as you turn SSK ON. It will first display roll and run
counts and then show the number of pump pulses used to cover each of the level sensors.
DUMP TUBING installation is tested by pumping up water into the large film drum and
letting it drain out. The cycle is repeated 3 times. Connect the DUMP and FLUSH tubing to
your drain or bottle. Fill the water bottle with water and connect it to tube #5. Insert
the large DRUM into SSK, keep the top off so you can observe the action. The DRUM should
fully empty every time it drains. If it does not, turn the unit off and recheck your DUMP
tubing. You can empty the HEAT TANK and DRUM by running DRAIN in NORMAL MODE.
The VALVE TEST is selected by pushing PLUS. Insert the PLUG into the coupling. When you
push any switch, a valve will open and the FILL pump will turn on as long as you hold the
switch. It will pump any solution in the HEAT TANK out of the DUMP/SAVE tubes. You can use
the CALIBRATE function in NORMAL mode to pump some water into the HEAT TANK.
The SAVE switch will indicate ON (red showing) on the display if it is on during the
VALVE TEST.
DIAGNOSTIC MODE
Select by holding MINUS as you turn SSK ON. This
is a technician level area. Acknowledge you are technically qualified by pressing PLUS.
This mode individually checks all of the machine function, sensors and actuators. SSK
may have to be opened to reach some of the sensors. See SERVICE.
Will display any level sensor that senses solution. SSK has the following Level
sensors: Low, 2-roll, 4-roll, 6-roll, 8 roll, drain level (located inside the coupling)
and the rotary selector valve (SSK-8R only). The SAVE switch can also be tested as a level
sensor.
You can test the sensors by connecting a clip lead between the solder lug on the side
of the HEAT TANK (central grounding [earth]) and the sensor.
If none of the level sensors is made, you can push MINUS to go to the VALVE test, PLUS
to go to the PUMP test and START to go to OTHER tests.
Pushing the switches will open the valves. (The valve test in TEST MODE allows you to
check flow through the valve by also turning on the FILL pump). Hold MINUS and push PLUS
to go back to LEVEL TESTER. Pumps are tested the same way. AUXILIARY is reserved for
future needs.
DR&ROT (push MINUS) will turn on the dryer and the spindle ROTATE motor. TEMP (push
PLUS) will show the HEX readings of the DRUM and HEAT TANK sensors, show the voltage
(120/230) and then take a few readings in HEX of the actual voltage.
GAT (push START) will exercise the ROTARY SELECTOR valve to both ends of travel, then
stop at tube #9. This is the middle of travel and is the position the valve must be in
when its internal tubing is mounted.
MAINTENANCE
Wipe off all spills when they occur.
Keep the stainless contact plates on the DRUM clean. Never touch with fingers. Clean
daily with alcohol and buff with Scotch Brite. Bend in the contactor springs on the body
periodically.
Use silicone grease to lubricate the "O" ring on the SNOUT of the processing
DRUM as needed.
Inspect the plastic sleeve on the STAPLE that turns the spindle - replace if worn.
Clean the reels as needed by soaking in a 50% solution of household bleach for 5
minutes. Rinse well with hot water.
ONCE A YEAR, open the unit (see SERVICE), unplug it first, and:
1. Protect the PC board from getting wet. Cover it with paper towels and a plastic
sheet.
2. Examine for any signs of wetness.
3. Clean the heat tank and the area above the heat tank with a cloth dampened with a
toilet bowl cleaner.
4. Replace the air filter on the dryer with a 3" square of air conditioner filter.
5. Remove the protection for the PC board and push down on all the connectors.
6. Close up the unit.
ALARMS & MESSAGES DO NOT TURN UNIT OFF until you check why.
A continuous series of short buzzes signals that the unit requires attention. Read the
message in the display to find out what needs to be done.
Back
DISCARD DEV! SEE BOOK ERR# 1 means that the developer did not
drain out. Work quickly, but calmly. The film is safe.
- Pull the film DRUM out and quickly stop up the end of the snout with your finger.
- Go to a sink or bucket and let the developer drain out of the snout.
- Re-insert the DRUM back into SSK.
The process will then continue, but check to see why the solution did not drain.
Back
CHK DRAIN TUBES SEE BOOK ERR# 2 means that some solution (not developer)
did not drain. Push start to stop the buzzer. Check your drain tubing. Is the tubing
crimped? Is the DUMP bottle full? When you have found the problem, correct it and push
START to let the process continue.
CHECK "SOLUTION NAME" means that there is not enough
solution for the processing to continue. Push START to turn off the alarm. Fill the
solution bottle and then push START. The process will continue.
FLUSH means that the unit was not flushed after the last
processing run. Push START to allow unit to flush itself.
NO AC means the unit is not plugged in. Plug the unit into a live
wall outlet.
DUMP TANK FULL Empty the DUMP bottle.
PLEASE TURN OFF Turn unit off when not in use. There is nothing
that needs warming up.
MACHINE FAILURE Problem with heat TANK temperature sensor. See
CORRECTING PROBLEMS.
SET CODE SSK code must be set before it can operate. See PROGRAM
MODE.
Back
CLEAN DRUM SENS! SSK has tested the DRUM temperature sensor and
determined that it needs cleaning. Wipe with alcohol to remove grease and fingerprints.
Buff with Scoth-Brite. Push in the contactor springs.
Back
CLEAN LEVEL SENSRS SSK has determined that one of your level sensors in
the heat tank may have some slime or a hair hanging from it. Open the unit (see CORRECTING
PROBLEMS / OPENING the UNIT) and clean off the sensors. Check for any moisture inside the
unit.
Back
REPL FILL PUMP SSK has determined that your FILL pump needs replacing.
Back
WAIT FOR AC If message flashes on and then goes
away do not worry. If the message stays on it means that developer has not touched the
film yet and that you are connected to a Uniterruptable Power Supply (UPS). SSK will wait
for AC electrical power to be restored before continuing the process. If the film was
already in developer when the power outage occurred, SSK will continue the process on UPS
power.
HINTS
Test a new batch of chemistry on your own film or run a test strip.
Back
PROCESSING PARAMETERS
S O L U T I O N, T i m e, T e m p ,T u b e ,C O M M E N T S
E6 Slide Processes.
7 Step E6 slides without prewet.
Air Preheat Varies to 37.8 Go to SLD DEV below
7 Step E6 slides with water prewet.
WATER prewet Time Temp 5
Checks drum temp
SLD DEV eloper 6:30 37.8 2 Very precise
WATER wash (3x) 2:00 37.8 5
SLD REV ersal 3:00 37.8 18
SLD C olor DEV 4:00 37.8 17 Very precise
SLD CONDitioner 3:00 37.8 16 pre-bleach
SLD BLEACH 8:00 37.8
6
COLOR FIX 4:00 37.8
13 SAVED FIX if switch ON
WATER wash (3x) 2:00 37.8 5 also used by C41 FIX
SLD STABilizer 2:00 23.9 9
4 Step E6 Slides without water prewet. Go to SLD DEV below
4 Step E6 Slide with water prewet. PRESET
WATER prewet Time Temp 5
Checks room temp
SLD DEV eloper 6:30 37.8 2 Very precise
WATER wash (2X) 2:00 23.9 5 Acts as cool stop
WATER wash 2:00 37.8
5
SLD C olor DEV 4:00 37.8 17 Very
precise
WATER wash (2X) 2:00 23.9 5
WATER wash 2:00 37.8
5
SLD BLIX 10:00 37.8
6 SAVED FIX when switch is ON
WATER wash (3x) 2:00 37.8 5
SLD STAB ilizer 2:00 23.9 9
Color Negative Processes.
Color Negative C41 without prewet. Go to C41 Dev below
Color Negative C41 with prewet PRESET
WATER preheat Time Temp 5 Checks drum
temp
C41 DEV eloper 3:15 37.8 3 Very precise
C41 BLEACH 6:00 35.5 8
WATER wash 2:00 35.5 5
COLOR FIX 6:00 35.5
13 SAVED FIX if switch ON
WATER wash (2X) 2:00 35.5 5 also used by E6 FIX
C41 STABilizer 2:00 23.9 10
Color Neg. Bleach+Fix combined no prewet. GO to C41 DEV
Color Negative Bleach+Fix combined with prewet.
WATER prehwet Time Temp 5 Checks room
temp
C41 DEV eloper 3:15 37.8 3 Very precise
C41 BLIX 3:00 35.5
8 SAVED FIX when switch is ON
WATER wash 2:00 35.5
5
C41 STAB ilizer 2:00 23.9 10
Black & White Processes. All are available in NORMAL MODE.
TRI X / PLUS X
B&W DEV eloper 4:40 23.9 4 end of BW
process is same
TMAX 100 / 400
B&W DEV eloper 5:30 23.9 4 end of BW
process is same
TMAX 3200 This is a warmer process 85oF (29.3oC)
vs 75oF (23.9oC)
B&W DEV eloper 5:45 29.3 4 end of BW
process is same
END OF BLACK & WHITE Common to all BW processes.
WATER wash 2:00 23.9
5 also acts as stop
B&W FIX 7:00 23.9
14 SAVED FIX is switch ON
WATER wash 2:00 23.9
5
B&W P erma WASH 2:00 23.9 15 hypo clear or
water
WATER wash 2:00 23.9
5
BW RINSE 2:00 23.9
11
CHEMICALS
BLACK AND WHITE
Use: 1. Kodak T-Maxim developer (B/W DEV) 2. Rapid B/W FIX 3. Hypo clearing
agent (B/W P WASH) such as Heico Perma-Washtm 4. B/W RINSE Photo-Flo (Kodak) or
Rexton’s Hyperwettm. Mix T-Max developer 1 part concentrate to 5 parts
water. It works better in a Sidekick than Kodak’s recommendation of 1:4.
COLOR NEGATIVES C-41
Use working strength solutions of any C-41 chemistry. Overflow solutions work well. If
you use replenishers remember to add starter to the developer to get a working strength
solution.
RA C-41 chemistry works well with the standard bleach and fix times. If you would like
to shorten the bleach and fix times see PROGRAM MODE.
SLIDES 7 STEP E-6
Back
Blue shift can be
corrected by adding sodium hydroxide (see chem. manufacturers instructions) to the color
developer or by diluting the reversal step. When reversal is too dilute, the slides will
have a green cast.
Bleach should be aerated (have air pumped through it). Use a fish tank type air pump
and run the tubing to the bottom of the bleach bottle. Do not use an airstone. Run for at
least 2 hours a day. Check reversal for scum growth - discard, clean bottle, re-mix. Check
color developer for separation - re-stir with mixing rod.
Back
SLIDES 4 STEP E-6
Unicolor, Photo-Technology, Tetanol or Beseler chemistry will work. (Some manufacturers
call their chemistry 3 step - they don’t include a wetting/stabilizing step. Use C-41
stabilizer or a wetting agent (Hyper-wet or Photo-Flo) for this step.
PROCESSES OTHER
MOTION PICTURE FILM (black layer on base). Process ECN-2. Process like normal C-41
film. Since SIDEKICK can use fresh solutions for each step, the black residue does not gum
up the unit. Turn SAVE switch OFF. After the last step, rinse under warm water and gently
rub the remaining residue from the film base. Do not touch the emulsion. Hang film to dry.
Wash reels with a soft brush in dish detergent.
Mix color chemistries in water that is at least 85 oF (29 oC).
Stir well. Wait one hour before using.
PUSH PROCESSING.
| Film |
Time |
Push 1 Stop |
| Agfa 201 440-2500 |
| APX 25 |
4:15 |
5:15 |
| APX 100 |
4:15 |
5:15 |
| AP 400 |
4:50 |
5:45 |
| Fuji 800 788-3854 |
| Neopan SS |
4:15 |
5:30 |
| Neopan 400 |
4:40 |
5:50 |
| Neopan 1600 |
3:30 |
4:40 |
| Ilford 201 265-6000 |
| HP5 PLUS |
4:30 |
5:30 |
| 100 DELTA |
4:30 |
5:30 |
| 400 DELTA |
5:00 |
6:00 |
| Delta 3200 |
7:30 |
9:00 |
| FP4 PLUS |
3:30 |
4:10 |
| PANF |
Not recommended |
| Kodak 800 242-2424 |
| PAN-X |
4:40 |
5:40 |
| PLUS-X |
4:40 |
5:40 |
| TRI-X |
4:40 |
5:40 |
| TMAX 100 |
5:30 |
6:35 |
| TMAX 400 |
5:30 |
6:35 |
| Select TMAX |
3200 |
@85oF |
| TMAX 3200 @85oF |
5:45 |
6:55 |
If you want to change the developer time for one run, hold MINUS as you push START. The
display will show the developer time. Change to desired time using the PLUS and MINUS.
When the proper time is displayed push START to begin. The next time you process the unit
will return to the normal time.
As a rough guide, 1 stop is about:
a) + 2 min. for Slides E-6.
b) + 30 sec for color negs C-41.
c) + 20% of normal dev time for B/W
Call film manufacturer for more complete information.
Back
4 X 5 INSTRUCTIONS (optional)
Practice loading the 4x5 HOLDER with the lights on. The HOLDER will process 4 sheets at
a time.
The 2 stainless clips are on the TOP of HOLDER. Rotate both clips toward the center
core.
Insert the sheets with the emulsion towards the center. 4x5 sheet film has notches in
one corner. Hold the sheet facing you with the longer side vertical. When the notches are
at the top right corner, the emulsion is facing you.
Load the 2 inside sheets first. Load from the TOP of the HOLDER. Squeeze the film so
that it can fit inside the ring of the HOLDER. Push the sheet into the groove. Use your
other hand to help guide the sheets.
After all the sheets have been loaded, rotate the stainless clips toward the outside
ring to hold in the sheets.
The spindle should then be inserted from the bottom of the HOLDER. Place the spindle
with the HOLDER(S) in the Processing DRUM and process normally. Select DRUM SIZE = 4 for 1
HOLDER in the 4-roll DRUM and DRUM SIZE = 6 for 2 HOLDERS in the 8-roll DRUM.
After processing:
1. Remove the HOLDER(S) from the spindle.
2. Rotate the stainless clips toward the center core of the HOLDER
3. Push the sheet up slightly from the bottom.
4. Pull the sheet from the TOP. Use your other hand to help guide the sheet.
5. Use your own method to dry the sheets.
6. Rinse the HOLDER(S), spindle and DRUM. AIR DRY. DO NOT USE HOT AIR.
Very thin base 4x5 film like Kodalith will not mount in the holder.
AUTOMATIC REPLENISHING
Initially set up your unit to run without automatic replenishment. When you are
familiar with the operation and satisfied with the results, start using the replenishment
option.
Super Sidekick model SSK-8R can replenish any 2 chemicals, usually bleach and fix for a
great reduction in chemical costs. You get the highest quality results, because the
developers are fresh.
Replenishment is turned on when 3 conditions are met:
- The solution is saved as either bleach or fix. Save only one of each when you are
replenishing.
- The SAVE switch on the back of the SSK is turned on (red showing).
- The percentage of replenishment as set in PROGRAM MODE is not zero. See PROGRAM MODE.
Start with 9% bleach and 30% fix replenishment.
Replenishers are connected like any other solution: bleach to tube #7 and fix to tube
#12.
The SAVED solution drains to a HOLDING bottle, next time SSK uses that solution it will
pump up the set percent of replenisher and then pump up the used solution. When the
solution is used again, it drains back to the HOLDING bottle.
Because of the added replenisher, the volume in the HOLDING bottle increases. You have
to arrange the bottle so that the overflow flows away or is emptied manually.
The RETURN tubes are connected to the SAVE FIX and SAVE BLEACH tubes on the back of
Super SIDEKICK.
Connect the HOLDING bottle as per drawing:
1. The RETURN tubing must follow all the rules of a DUMP line.
a. Keep it short and going down as quickly as possible.
b. Minimum of a 12" drop.
c. End of tubing must never be in solution.
2. Allow 2 feet of slack on USED tubing.
3. Aerate the bleach with a fish tank air pump (2 hours/day or more) through the air
fitting. Do not use an airstone.
- The OVERFLOW should be directed to your container.
- Use black �" tubing to reach the bottom of the HOLDING tank for USED and Air.
Monitor your process results. If the film does not clear (milky) increase the fix
replenishment rate. You can usually re-fix the film manually to correct the problem.
If the film looks flat, muddy or the black areas have a red tinge, increase the bleach
replenishment rate and/or make sure the bleach is aerated. You can usually re-bleach the
film to correct the problem.
SERVICE
CORRECTING PROBLEMS
| Will not start up or gets stuck in process
step. Alarm does not sound |
Selector Valve jammed. Record display
messages. Remove DRUM, drain solution and put DRUM in bucket of water to protect the film.
Unplug & open unit and check ribbon connector and tubing to Selector (Rotary)
Valve. |
| Excessive leakage from front of DRUM, where
spindle passes through |
1.Improper draining. Reread how to run DUMP
lines. Run DUMP LINE TEST in TEST MODE. 2.The STAPLE is touching the spindle bushing
while the spindle is being pulled in. Adjust by mounting the STAPLE closer to the motor. |
| "Machine failure" message |
Temperature sensor problem. Check ribbon
connector from heat tank. Make sure it is pushed down, properly aligned and pins are
straight. Handle carefully. Lift up squarely. Do not just pull ribbon. If program
module was just replaced check it for bent pins
. |
| Film too dark or light |
1.Temperature off. See "Calibrate Temp" 2.Chemical
quality, mixing or age. |
| Film color off |
Chemical quality, mixing or age. |
| DRUM not recognized |
Clean contact plates on PROCESS DRUM. Run
sensor test. |
| Dev time counting down when STARTed |
DRUM sensor shorted. Replace DRUM. |
| Leak from snout. |
Grease "O" ring on DRUM snout. |
Use a telephone near Sidekick when calling in for service.
OPENING the UNIT. Qualified Personnel only
The unit must be opened in order to reach the internal components.
1) Remove the power cord from the unit and pull at least one battery from the battery
holder. Remove all the solution tubing from the tubes on the back of the unit.
2) Unscrew the 4 screws holding the BODY to the base (2 on the right side and 2 on the
left side). Lift up on the right side of the BODY so that it hinges on the left side. Rest
the BODY on its left side.
Back
Parts Replacement
SELECTOR VALVE REPLACEMENT
Open the unit (see OPENING). Cover the PC Board with paper towels and a plastic sheet
to protect it from getting wet. The SELECTOR VALVE (SV) is now exposed. The tubing from
the SV is held against the side of the case by a clamp. Open the clamp. With a paper towel
in hand; remove the SV tubing from the pump fitting.
Remove the ribbon connector of the SV from the PC board. Carefully lift the connector
straight up. Do not bend the pins. The SV is held with 4 screws. Unscrew and remove SV.
Carefully turn the SV so that it lines up on tube #9. Install the new SV. Fasten with
the 4 screws. Clamp the tubing to the case. The black mark on the tubing should line up
with the bottom of the clamp block. Push the end of the tubing onto the pump.
Remove the protective socket from the connector of the new SV and place it on the old
SV connector. Replace the electrical connector in the socket marked SELECTOR VALVE on the
PC board. The mark on the connector should be on the lower left corner.
Close up the unit. Do a test processing run.
PRINTED CIRCUIT (PC) BOARD REPLACEMENT
Open the unit (see OPENING). Locate the circuit board. Carefully note how each
connector is mounted before you pull it from the board. Pull away squarely from the board,
be careful not to bend the pins. Do not just yank the ribbon cables. Rotate the 2 clamps
holding the PC board and remove it.
Push the new PC against the stop on the right side of the track and then twist the
clamps. Carefully replace all the connectors. Use the wiring diagram (p.16) as a guide for
positioning. Close the unit and run CALIBRATE (see SPECIAL FUNCTIONS).
TEMPERATURE SENSOR REPLACEMENT
Open the unit (see OPENING). Locate the heating tank. The temperature sensor screws
into the side of the heating tank. There are 2 wires connecting the sensor. One goes to a
solder lug, and the other is soldered to a black wire. Cut away both wires (the wires are
interchangeable).
Wrap the new sensor with 4 wraps of Teflon tape and screw into the heat tank. Solder
the 2 wires where you cut the old wires. Close the unit and run CALIBRATE (see SPECIAL
FUNCTIONS) to match the sensor to the PC board.
SOLUTION LEVEL SETTING
Open the unit (see OPENING). Locate the 5 level sensors on the heat tank. The sensor
closest to the left corner is low level (4 oz -120 ml) followed by: 9 oz, 15 oz, 22 oz and
29 oz. Pour the proper amount of water (start with 4 oz then add 5 oz etc.) into the heat
tank. Hold the sensor where it passes over the tank wall with one hand and bend the end of
the sensor with the other hand so that the sensor just touches the water. Empty the heat
tank by closing the unit and running DRAIN (see SPECIAL FUNCTIONS).
SHIPPING the UNIT
Prepare the unit by running CLEAN LINES (see SPECIAL FUNCTIONS). Open the unit (see
OPENING) and wipe up any loose solutions. Tie down the 2 pumps (through the holes in the
base) with strong twine. Remove the magnetic stirrer (white pill) from inside the heat
chamber. Close the unit. Remove and keep stir bar, plug and power cord.
Place the unit in a plastic bag. Use as much packing (balled newspapers, bubble wrap
etc. <please do not use small Styrofoam chunks>) as possible to cushion the unit
from the walls of the box.
PARTS LIST SSK-8R Always specify model and serial number.
| SSK-SVR |
Selector Valve |
490.- |
AF-SPL |
Spindle 4-roll |
60.- |
| SK8-HT |
Heat tank |
350.- |
SK8-SPL |
Spindle 8-roll |
90.- |
| AF-TS |
Temperature sensor |
50.- |
SK8-D4 |
Process drum 4-roll |
140.- |
| SSK8-PC |
Printed circuit brd |
250.- |
SK8-D8 |
Process drum 8-roll |
160.- |
| AD-DISP |
Display |
90.- |
SSK-BOTH |
Holding bottle |
25.- |
| AF-TR |
Transformer |
75.- |
AF-BOT5 |
Bottle 5 Gal |
20.- |
| AD-P |
Pump |
140.- |
ADC-LEV |
Sensor for dump btl |
50.- |
| AF-DRT |
Dryer internal |
50.- |
AF-FV |
Float valve |
20.- |
| AF-DR8 |
Wall dryer 8 roll |
280.- |
AF-ICE |
Water connect kit |
15.- |
| AF-V3 |
Valve triple |
180.- |
AF-BOT2L |
Bottle 2 liter |
5.- |
| AF-VCL |
Valve coil 120V |
25.- |
AF-REEL |
Film reels Paterson |
10.- |
| AF-VST |
Valve seat |
5.- |
AF-LNCRD |
Power cord |
10.- |
| SSK-ROT |
Rotate motor |
105.- |
DP-SW |
Switch power. 2 pole |
7.- |
| AF-STAP |
Staple bushing |
10.- |
DP-PSW |
Push switch |
5.- |
| AF-STSL |
Staple sleeve (2) |
1.- |
AF-SW |
Switch save |
3.- |
| AF-4X5 |
4x5 holder |
90.- |
AF-BOT1G |
Bottle 1 gal (4 l) |
7.- |
| AF-C120 |
120 film clamps (3) |
2.- |
AF-OR |
"O" ring (3) |
2.- |
SUPPLIER PHONES
| 609 396-1456 |
Our help line. First check
CORRECTING PROBLEMS |
| 800 221 1555 |
Russell. 7-step Slide Chemistry.
Very helpful |
| 800 243-2776 |
Agfa |
| 800 788-3854 |
Fuji |
| 201 265-6000 |
Ilford |
| 800 242-2424 |
Kodak |
| 800 999-4042 |
PSI. Makes Unicolor 4-step slide
chemistry |
| 800 525-2821 |
Jobo. Imports Tetanol (Germany)
4-step slide chemistry |
| 800 621-5488 |
Brandess Kalt. Sell Heico Perma
Wash fix (hypo) remover |
| 800 553-2001 |
Porters. Get catalog. Has Rexton
Hyperwet #35-0597, a B/W rinse |
| 708 833-0300 |
McMasters. Ask for catalog. Has
silicone grease #1418K4 |
| 800 537-9724 |
United Plastics. Ask for catalog.
Good source for bottles, tubing etc. |
| 800 537-9724 |
Good stand for unit. Rubbermaid
4505. United Plastics # 06998 |
| 202 223-6906 |
Interclone. Profit-making slide
copier |
| 800 255-1522 |
Pic-Mount. Slide Mounters, mounts
and boxes |
| 612 936-9500 |
Pakon. Slide mounters and mounts. |
| 716 377-6375 |
Gepe. Snappy slide mounter. Slide
mounts for Snappy mounter |
| 800 309-4239 |
CDW. Tritt Lite. BC PRO 1400
Uninterruptable Power Supply |
Back
Push, Pull
Calculations
| Film speed |
Film Shot at |
Push |
Pull |
| 100 |
200 |
1 |
|
| 100 |
400 |
2 |
|
| 100 |
800 |
3 |
|
| 100 |
1600 |
4 |
|
| 200 |
400 |
1 |
|
| 200 |
800 |
2 |
|
| 200 |
1600 |
3 |
|
| 200 |
3200 |
4 |
|
| 400 |
800 |
1 |
|
| 400 |
1600 |
2 |
|
| 400 |
3200 |
3 |
|
| 800 |
1600 |
1 |
|
| 800 |
3200 |
2 |
|
| 1600 |
3200 |
1 |
|
| 3200 |
1600 |
|
1 |
| 3200 |
800 |
|
2 |
| 3200 |
400 |
|
3 |
| 3200 |
200 |
|
4 |
| 3200 |
100 |
|
5 |
| 1600 |
800 |
|
1 |
| 1600 |
400 |
|
2 |
| 1600 |
200 |
|
3 |
| 1600 |
100 |
|
4 |
| 800 |
400 |
|
1 |
| 800 |
200 |
|
2 |
| 800 |
100 |
|
3 |
| 400 |
200 |
|
1 |
| 400 |
100 |
|
2 |
| 200 |
100 |
|
1 |
| Film Type |
Dev. Time |
Push/Pull 1 |
Push/Pull 2 |
Push/Pull 3 |
| APX25 |
4:15 minutes |
+/-1:00 min |
+/-2:00 min |
+/-3:00 min |
| APX100 |
4:15 minutes |
+/-1:00 min |
+/-2:00 min |
+/-3:00 min |
| AP400 |
4:50 minutes |
+/-0:55 min |
+/-1:50 min |
+/-2:45 min |
| Neopan SS |
4:15 minutes |
+/-1:00 min |
+/-2:00 min |
+/-3:00 min |
| Neopan 400 |
4:40 minutes |
+/-1:10 min |
+/-2:20 min |
+/-3:30 min |
| Neopan 1600 |
3:30 minutes |
+/-1:10 min |
+/-2:20 min |
+/-3:30 min |
| HP5 Plus |
4:30 minutes |
+/-1:00 min |
+/-2:00 min |
+/-3:00 min |
| 100 Delta |
4:30 minutes |
+/-1:00 min |
+/- 2:00 min |
+/-3:00 min |
| 400 Delta |
5:00 minutes |
+/-1:00 min |
+/-2:00 min |
+/-3:00 min |
| SFX |
6:00 minutes |
+/-1:10 min |
+/-2:20 min |
+/-3:30 min |
| Universal 400 |
5:00 minutes |
+/-1:00 min |
+/-2:00 min |
+/-3:00 min |
| FP4 Plus |
3:30 minutes |
+/-0:40 min |
+/-1:20 min |
+/-2:00 min |
| Pan-X |
4:40 minutes |
+/-1:00 min |
+/-2:00 min |
+/- 3:00 min |
| Plus-X |
4:40 minutes |
+/-1:00 min |
+/-2:00 min |
+/-3:00 min |
| Tri-X |
4:40 minutes |
+/-1:00 min |
+/-2:00 min |
+/-3:00 min |
| Tmax 100 |
5:30 minutes |
+/-1:05 min |
+/-2:10 min |
+/-3:15 min |
| Tmax 400 |
5:50 minutes |
+/-1:05 min |
+/-2:10 min |
+/-3:15 min |
| Cosmos |
5:00 minutes |
+/-1:00 min |
+/-2:00 min |
+/-3:00 min |
| Tmax 3200 |
5:45 minutes |
+/-1:10 min |
+/-2:20 min |
+/-3:30 min |
Back
Black and White Developing Times
| Film |
Time |
| Agfa 201 440-2500 |
| APX 25 |
4:15 |
| APX 100 |
4:15 |
| AP 400 |
4:50 |
| Fuji 800 788-3854 |
| Neopan SS |
4:15 |
| Neopan 400 |
4:40 |
| Neopan 1600 |
3:30 |
| Ilford 201 265-6000 |
| HP5 PLUS |
4:30 |
| 100 DELTA |
4:30 |
| 400 DELTA |
5:00 |
| Delta 3200 |
7:30 |
| FP4 PLUS |
3:30 |
| PANF |
Not recommended |
| Kodak 800 242-2424 |
| PAN-X |
4:40 |
| PLUS-X |
4:40 |
| TRI-X |
4:40 |
| TMAX 100 |
5:30 |
| TMAX 400 |
5:30 |
| Select TMAX |
3200 |
| TMAX 3200 @85oF |
5:45 |
Back
First Frames
Not Developed
First turn your unit on leaving the drum off
and press the start button. If it starts, let the unit load the water up and see which
sensor in the heating chamber it stops. If it stops at the middle sensor, the two roll
drum sensor is bad and must be changed. If its the third, then its the four roll drum
sensor.
If the unit beeps and displays "insert proc drum", check your level
sensors for correct settings.Working from left to right, add 3oz of water to the heating
chamber.Make sure the tip of the first sensor is just touching the surface of the
water.Add 4 more oz of water, giving you 7 oz's and adjust the middle sensor. Now add 7
more oz of water giving you 14 oz's and adjust the third.If good, check to see if your
heating chamber empties out when fill the processing drum.. Third, try taking your largest
drum, no lid or spindle, insert it in the unit and add water. Let sit for 10 minutes. If
the level drops in the drum you will have to remove the valve assembly. Chances are there
is a piece of film stuck in there causing the valve to remain open during the process
It is located on the inside of the unit and in the middle. You can identify it by
its blue body and the two or three solenoids that is attached to it. if its two solenoids,
the wires will be yellow and black on one side and white and black on the other.If it has
three, the wire colors are, Grey and black, yellow and black and white and black.
You can remove the valve assembly by removing the two screws that hold it in the
Grey rectangular plastic block. Cover the circuit board! Start by
removing the solenoid with the yellow and black wire.
If you find nothing on the rubber seal or in side the valve body, remove the other
solenoid and check there
Back
Back
Stuck in process,
Bubbles from Front of Drum
If the unit appears stuck in one
part of the process and you here a pump running and bubbles coming from the front of the
processing drum, the low level sensor is making contact to the steel base plate of the
heating chamber, causing the unit to think there is still solution in there. First remove
the door on the right side of the unit so you will be able to look inside the heating
chamber. Look at the sensor furthest away from you. Make sure it is not touching the
bottom and that the spinbar has not come loose and has wedged itself between the sensor
and the bottom. If the sensor is touching, readjust it to 3oz of water. If the spinbar is
the problem, take a pencil and give it a shove to the right side corner. There a magnet
will grab it and hold it place.
If the above two are alright:
Take a pencil and run it under
all the level sensors. If the pump stops and the process continues, there was something
like a hair or algae from reversal hanging on the first level sensor. After the process,
inspect the heating chamber and clean. Also if your running 7 step E6 chemistry, inspect
your reversal bottle for algae.
Back
Not Loading one of the Chemicals
First make sure there is enough
chemical in the bottle. If that is not the problem, then the selector valve is sticking
slightly and needs a few lube cycles run on it.
Turn the unit on, hold the plus
button until you reach "Lube". Press the start button. Wait until the unit beeps
and tells you to "turn off unit".
Take the allen wrench that came
with the unit and insert it into the grease fitting in the back of the unit. Looking from
the front, it is above the last steel tube from the selector valve on the right. Give it
1/2 turn clockwise and turn the unit on until it Initializes.Repeat the
process again.
Back
Stuck in
"Flush"
This is the only function
the machine will not alarm if there is a problem.
First make sure you have
not run out of water or using deionized water. If there is plenty of water, look in the
heating chamber to see if there is water in it. If there is, see if there is water coming
out the flush line. If there is no water coming out the flush line and the heating chamber
has some water in it, turn the unit off then back on again and select drain. If the
heating chamber empties out, the load pump, the pump that draws the
solutions in the unit is failing. If it does not drain out, the fill
pump is failing
Back
Not Recognizing 4 Roll Drum-SK8
If the SK8 does not recognize the drum,
first clean the contacts on the machine and the drum. Gently push the contacts together on
the machine.
Insert the drum and try again. If the drum is
still not recognized, try inserting the other drum. If the machine operates properly, the
problem is with the one drum. Usually this means the sensor inside the drum has failed and
the drum needs to be replaced.
If neither drum is sensed by the machine, a
problem exists with one of the wires attached to the back of the contacts inside the
machine.
Open the unit and inspect each contact from the
inside.
On one contact you will find a red wire, and on
the other you will find a green.
Make sure both wires are tighten to the
contacts, and that they are not touching each other.
If all the above seems good, call the tech
support at Photo-Therm
Back
Only Half the
Roll Develops
If after processing you
find only half the roll was developed, find out first if the correct amount was selected
from the display, 2, 4, 6, or 8 and if the spacer was used if it was a 1, 2, 5, 6 roll
run.
If all the above was correct, check
your spindle for bent pins. When the pins on the spindle becomes bent in, it has a
tendency to push off the staple bushing during the process, leaving the spindle
stationary. When that happens, only the bottom half of the reel receives chemistry, giving
you a pattern of so many good frames, so many bad.
If the above two seem good,
insert the drum that was used, select the amount that was chosen, and start an E6 run. The
first solution that gets drawn up is water, so you wont be wasting chemistry.
On the right hand side of
the machine is a black door that you can remove and look inside the heating chamber. If
you selected 2 rolls, the water should stop at the second level sensor ( from left to
right ). If it was 4, it would be the middle sensor, 6 the forth sensor, and 8 the last.
If it stops at a different
sensor, there is a problem with either with the circuit board or the ribbon cable that
runs from the heating chamber. in this case, it's best to call PhotoTherm tech support,
(609) 396-1456.
If the water stops at the
correct sensor,
Take your largest drum, no lid
or spindle, insert it in the unit and add water. Let sit for 10 minutes. If the level
drops in the drum you will have to remove the valve assembly. Chances are there is a piece
of film stuck in there causing the valve to remain open during the process
It is located on the inside of the unit and in the middle. You
can identify it by its blue body and the two or three solenoids that is attached to it. if
its two solenoids, the wires will be yellow and black on one side and white and black on
the other.If it has three, the wire colors are, Grey and black, yellow and black and white
and black.
You can remove the valve assembly by removing the two screws that
hold it in the Grey rectangular plastic block. Cover the circuit board! Start
by removing the solenoid with the yellow and black wire.
If you find nothing on the rubber seal or in side the valve body,
remove the other solenoid and check there
Back
Processing drum
starts to count down
If after you insert the four or the eight roll processing
drum and press start the drum starts to count down on the display, the sensor inside the
drum has shorted and the drum must be replaced. If this happens on both drums, the
contactors on the machine my be making contact inside
Open the unit and
inspect each contact from the inside.
On one contact you will find a red wire, and on
the other you will find a green.
Make sure both wires are tighten to the
contacts, and that they are not touching each other.
Back
First Frames Not Developed SK8
If the first few frames are not getting
developed, there is not enough solution in the processing drum to reach the center of the
reel
Working from left to right, add 4oz of water to the heating chamber.Make sure
the tip of the first sensor is just touching the surface of the water.Add 5 more oz of
water, giving you 9 oz's and adjust the second sensor. Now add 6 more oz of water giving
you 15 oz's and adjust the third. Now add 7 more oz of water giving you 22oz of water and
adjust the forth then 7 more oz and and adjust the fifth. IF YOUR
FOUR ROLL DRUM IS THE NEWER STYLE WITH RED CLIPS HOLDING THE TOP TO THE DRUM, THEN THE
MEASUREMENTS ARE, 4oz, 7oz, 4oz, 7oz, 7oz.
If good, check to see if your heating chamber
empties out when fill the processing drum.. Third, try taking your largest drum, no lid or
spindle, insert it in the unit and add water. Let sit for 10 minutes. If the level drops
in the drum you will have to remove the valve assembly. Chances are there is a piece of
film stuck in there causing the valve to remain open during the
process
It is located on the inside of the unit and in the middle. You can identify it by
its blue body and the two or three solenoids that is attached to it. if its two solenoids,
the wires will be yellow and black on one side and white and black on the other.If it has
three, the wire colors are, Grey and black, yellow and black and white and black.
You can remove the valve assembly by removing the two screws that hold it in the
Grey rectangular plastic block. Cover the circuit board! Start by removing
the solenoid with the yellow and black wire.
If you find nothing on the rubber seal or in side the valve body, remove the
other solenoid and check there
Back
Machine will not
Draw up Chemicals
If the machine does not fill the heating
chamber, to the proper level, in a predetermined time, the unit will go into an alarm and
the display screen will indicate which chemical was unsuccessfully loaded.
First check the chemical bottle to make sure
there is an ample amount in the container. If OK, the problem is either the selector valve
or pump.
First, open the unit. Be sure to cover the
circuit board with a towel to keep from getting wet. Then locate the fill pump on the gray
base plate. It will be the pump closest to the center of the base plate. Remove the vinyl
tube that runs from the selector valve to the pump at the pump end. Attach your water line
(port 5) to the pump. Turn the machine on and select, "Calibrate Temp", press
start. If the pump, appears to be weak, you will need to order a new pump. If it appears
to work well, chances are the rotary selector valve is dirty and needs to be cleaned.
Remove the rotary selector valve and
disassemble it. With warm soapy water, carefully clean the face plate, (The area on which
the o rings travel against) DO NOT USE ANYTHING ABRASIVE AS IT WILL SCRATCH THE SURFACE!
Reassemble and run "Clean Lines" to
insure it is working well.
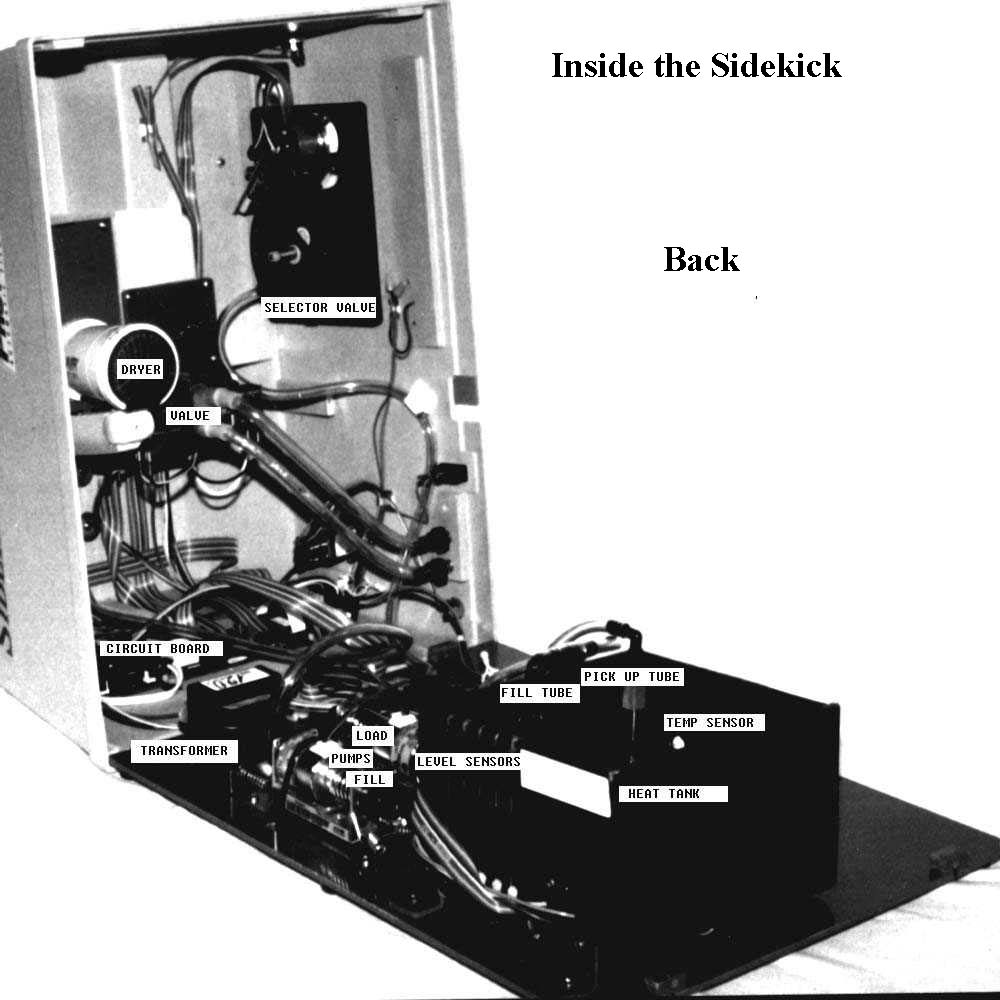
Unit
Diagram
Back
Only Half the Roll
Develops sk4
If after processing you
find only half the roll was developed, try
these test to determine where the problem is.
First turn your unit on leaving the drum
off and press the start button. If it starts, let the unit load the water up and see which
sensor in the heating chamber it stops. If it stops at the middle sensor, the two roll
drum sensor is bad and must be changed. If its the third, then its the four roll drum
sensor.
If the unit beeps and displays "insert proc drum", check your level
sensors for correct settings.Working from left to right, add 3oz of water to the heating
chamber.Make sure the tip of the first sensor is just touching the surface of the
water.Add 4 more oz of water, giving you 7 oz's and adjust the middle sensor. Now add 7
more oz of water giving you 14 oz's and adjust the third.If good, check to see if your
heating chamber empties out when fill the processing drum.. Third, If all the above was correct, check your spindle for bent pins.
When the pins on the spindle becomes bent in, it has a tendency to push off the staple
bushing during the process, leaving the spindle stationary. When that happens, only the
bottom half of the reel receives chemistry, giving you a pattern of so many good frames,
so many bad. Forth, try taking your largest drum, no lid or spindle, insert it in the unit and add water. Let sit for 10 minutes.
If the level drops in the drum you will have to remove the valve assembly. Chances are
there is a piece of film stuck in there causing the valve to remain open during the
process
It is located on the inside of the unit and in the middle. You can identify it by
its blue body and the two or three solenoids that is attached to it. if its two solenoids,
the wires will be yellow and black on one side and white and black on the other.If it has
three, the wire colors are, Grey and black, yellow and black and white and black.
You can remove the valve assembly by removing the two screws that hold it in the
Grey rectangular plastic block. Cover the circuit board! Start by removing
the solenoid with the yellow and black wire.
If you find nothing on the rubber seal or in side the valve body, remove the other
solenoid and check there
If all the above was correct, check your
spindle for bent pins. When the pins on the spindle becomes bent in, it has a tendency to
push off the staple bushing during the process, leaving the spindle stationary. When that
happens, only the bottom half of the reel receives chemistry, giving you a pattern of so
many good frames, so many bad.
If the above two seem good, insert the
drum that was used, select the amount that was chosen, and start an E6 run. The first
solution that gets drawn up is water, so you wont be wasting chemistry.
On the right hand side of the machine
is a black door that you can remove and look inside the heating chamber. If you selected 2
rolls, the water should stop at the second level sensor ( from left to right ). If it was
4, it would be the middle sensor, 6 the forth sensor, and 8 the last.
If it stops at a different sensor,
there is a problem with either with the circuit board or the ribbon cable that runs from
the heating chamber. in this case, it's best to call PhotoTherm tech support, (609)
396-1456.
If the water stops at the correct
sensor,
Take your largest drum, no lid or
spindle, insert it in the unit and add water. Let sit for 10 minutes. If the level drops
in the drum you will have to remove the valve assembly. Chances are there is a piece of
film stuck in there causing the valve to remain open during the process
It is located on the inside of the unit and in the middle. You
can identify it by its blue body and the two or three solenoids that is attached to it. if
its two solenoids, the wires will be yellow and black on one side and white and black on
the other.If it has three, the wire colors are, Grey and black, yellow and black and white
and black.
You can remove the valve assembly by removing the two screws that
hold it in the Grey rectangular plastic block. Cover the circuit board! Start
by removing the solenoid with the yellow and black wire.
If you find nothing on the rubber seal or in side the valve body,
remove the other solenoid and check there
Back
Machine Stuck in
Process-Rotary selector valve
If the SideKick appears to become stuck in a
process and you have a rotary selector valve,
(circular with 18 tubes), the most common cause
is chemical build up on the sensor wheel located inside the unit causing it to loose
postion.
First open the machine and remove the rotary selector valve. Carefully disassemble the valve and clean the
wheel and face plate with hot water and soap. Concentrate on cleaning the cutaways on the
sensor wheel, located under the triangular pressure plate.
USE ONLY A PAPER TOWEL TO CLEAN PARTS WITH,
NOTHING ABRASIVE!
Reassemble the selector valve and mount it back
on machine.
Turn unit on. The machine will position the
selector valve automatically
Back
Slides look "Grey" or
"Dirty"
If your slides have a "Grey" or
"Dirty" look to them, this is from under fixing. To eliminate other
causes, try, in 7 step chemistry, refixing your film, in 4 step reblixing. Roll the
processed film back on a reel and place the reel in a small container. Fill the container
with enough fresh fix or blix to cover the reel. Let sit for 10 minutes. Remove
from the container, wash the film off and dry. If the film clears up, remix the fix or
blix.
If refixing or reblixing had no effect on the
look of the film, call phototherm tech support. (609) 396-1456
Back
Black and White Film looks
Grainy
The most common cause of grainy black and white
film is the developer is a little to concentrate.If your using Tmax developer, mix at a 5
to 1 ratio instead of the instructed 4 to 1. This should remove most of this condition.
Back
B/W Film looks over developed
If your B/W film looks over developed, this is
usually from the temperature being to high.
First, when you mix the developer, make sure
the temperature of the mixed developer is not above the processing temperature.Let the
newly mixed chemistry sit for a period of time to lower the temperature.
Second, run a "Calibrate
Temp" to make sure the Heating chamber is alright. Also if you own an sk8, sk8rg,
sk8rh or a super sidekick, make sure the contactors on the drum and machine are clean and
making good contact. Check HERE to find out how
Third, if your selector valve is the old style,
(13 stainless steel tubes) run a "dummy run" no film, and time the developer. If
its to long, the problem is the selector valve is low on grease causing it to take a long
time to make it to its next position. This will add time on your developer
Run the lube cycle 2 or 3 times
Turn the unit on, hold the plus
button until you reach "Lube". Press the start button. Wait until the unit beeps
and tells you to "turn off unit".
Take the allen wrench that came
with the unit and insert it into the grease fitting in the back of the unit. Looking from
the front, it is above the last steel tube from the selector valve on the right. Give it
1/2 turn clockwise and turn the unit on until it Initializes.Repeat the
process again.
Back
Under Developed Black and White
If your B/W is coming out under developed either your
temperature is to low or your first developer is weak or diluted
1. Make sure that you are not "flooding" from the
processing drum. If during the process the drum starts leaking chemistry, causing it to
build up in the area underneath, a contamination is occurring in side the drum. One
chemical is being loaded on top the previous solution, causing the newly loaded chemical
to weaken . If this condition occurs, the processed film will almost always come out dark
or magenta.
Check to document on "Flooding at
Drum" to correct this problem
2. If you are not flooding, make sure the temperature is
correct in the heating chamber. Run a "Calibrate Temp" from
the unit and if you own an 8 roll unit or a super sidekick check your drums
3. If your temperature is correct, remix developer
Back
C41 Film looks Grainy
The most common cause of grainy C41 film is the
developer is a little to concentrate or the agitation is to fast. Try diluting the
developer by 1 part. If that does not help call PhotoTherm tech support about the rotate
motor (609) 398-1456
If you own a Super Sidekick 8rh, go to the programming mode and
re adjust the rotate speed
Back
C41 Film looks over developed
If your C41 film looks over developed (dark),
this is usually from the temperature being to high or the starter is old or not used.
First, when you mix the developer, check your
mixing instructions. Then make sure the temperature of the mixed developer is not above
the processing temperature.Let the newly mixed chemistry sit for a period of time to lower
the temperature.
Second, run a "Calibrate
Temp" to make sure the Heating chamber is alright. Also if you own an sk8, sk8rg,
sk8rh or a super sidekick, make sure the contactors on the drum and machine are clean and
making good contact. Check HERE to find out how
Third, if your selector valve is the old style,
(13 stainless steel tubes) run a "dummy run" no film, and time the developer. If
its to long, the problem is the selector valve is low on grease causing it to take a long
time to make it to its next position. This will add time on your developer
Run the lube cycle 2 or 3 times
Turn the unit on, hold the plus
button until you reach "Lube". Press the start button. Wait until the unit beeps
and tells you to "turn off unit".
Take the allen wrench that came
with the unit and insert it into the grease fitting in the back of the unit. Looking from
the front, it is above the last steel tube from the selector valve on the right. Give it
1/2 turn clockwise and turn the unit on until it Initializes.Repeat the
process again.
Back
Under Developed C41
If your C41 is coming out under developed, (light)
either your temperature is to low or your developer is weak or diluted
1. Make sure that you are not "flooding" from the
processing drum. If during the process the drum starts leaking chemistry, causing it to
build up in the area underneath, a contamination is occurring in side the drum. One
chemical is being loaded on top the previous solution, causing the newly loaded chemical
to weaken . If this condition occurs, the processed film will almost always come out light
or magenta.
Check to document on "Flooding at
Drum" to correct this problem
2. If you are not flooding, make sure the temperature is
correct in the heating chamber. Run a "Calibrate Temp" from
the unit and if you own an 8 roll unit or a super sidekick check your drums
3. If your temperature is correct, remix developer
Back
Leaking At Drum
Super Sidekick
Flooding at the drum, (excessive dripping at
spindle area),is cause by one of two reasons:
1. Level sensors set to high
2. Wrong amout of reels selected
3. Unit not Level
First check your level sensors for proper
adjustment. This procedure is explained in your Manual.
If the levels appear to be correct, check with
the operator to eliminate the possibility of human error.
( processing two rolls, selected four )
If the above two are correct, test for unlevel
machine. Take the four reel drum ( no lid ) and a
spindle, and insert it in the unit. Add 15 oz
of water in the drum. Inspect the distance between the surface of the water and the bottom
of the spindle, first on the left side of the drum, then the right. If the water level
appears to be lower on the right side, shime the left side of the unit to even out the
water
Back
Stuck in
"Flush" ( Unit Alarms )
First make sure you have
not run out of water or are using deionized water.
The unit will attempt to draw water
from the supply during the flush mode. If, after 50 seconds, the unit does not sense
water, it will go into an alarm.[Note: using deionized water will not be sensed by the
unit causing it to alarm] CHECK TO SEE IF YOU HAVE WATER. If there is plenty of water, and
you are not using deionized water, look in the heating chamber to see if there is water in
it. If there is, see if there is water coming out the flush line. If there is, then most
likely a green ground wire that is soldered to the bottom of the heating chamber has
detached, causing the level sensors not to sense water. If there is no water coming out
the flush line and the heating chamber has some water in it, turn the unit off then back
on again and select drain. After draining, remove the black door thats located on the
right side of the unit, select flush from the plus button and press start. Observe by
looking through the opening on the right side of the unit, the flow of water entering the
heating chamber. If it is weak and the unit goes into an alarm again, the load pump, is defective and must be replaced
Back
Clean Sensors
If you receive the message to "clean
sensor", the unit cannot read the temperature sensor mounted inside the drum
correctly. First clean the contacts on the machine and the drum. Gently push the contacts
together on the machine.
Insert the drum and try again. If the drum is
still not recognized, try inserting the other drum. If the machine operates properly, the
problem is with the one drum. Usually this means the sensor inside the drum has failed and
the drum needs to be replaced.
If neither drum is sensed by the machine, a
problem exists with one of the wires attached to the back of the contacts inside the
machine.
Open the unit and inspect each contact from the
inside.
On one contact you will find a red wire, and on
the other you will find a green.
Make sure both wires are tighten to the
contacts, and that they are not touching each other.
If all the above seems good, call the tech
support at Photo-Therm
Back
E6 looks over developed
If your E6 film looks over developed (Light),
this is usually the result of one of the following reasons:
First, when you mix the developer, check your
mixing instructions. Then make sure the temperature of the mixed developer is not above
the processing temperature.Let the newly mixed chemistry sit for a period of time to lower
the temperature.
Second, run a "Calibrate
Temp" to make sure the temperature is not running hot. Also if you own an sk8,
sk8rg, sk8rh or a super sidekick, make sure the contactors on the drum and machine are
clean and making good contact. Check HERE to find out
how
Third, if your selector valve is the old style,
(13 stainless steel tubes) run a "dummy run" no film, and time the developer. If
its to long, the problem is the selector valve is low on grease causing it to take a long
time to make it to its next position. This will add time on your developer
Run the lube cycle 2 or 3 times
Turn the unit on, hold the plus
button until you reach "Lube". Press the start button. Wait until the unit beeps
and tells you to "turn off unit".
Take the allen wrench that came
with the unit and insert it into the grease fitting in the back of the unit. Looking from
the front, it is above the last steel tube from the selector valve on the right. Give it
1/2 turn clockwise and turn the unit on until it Initializes.Repeat the
process again.
Back
Under Developed E6
If your E6 is coming out under developed, (dark) either your
temperature is to low or your developer is weak or diluted
1. Run a "Calibrate Temp" from
the unit to confirm the developer is reaching the correct temperature
If you own an 8 roll unit check your drums sensors and contacts on the machine to make sure they are
clean. Dirty contacts on the drum will report back the the unit the wrong ambient
temperature causing the unit to under/overheat the developer.
2.Make sure that you are not "flooding" from the
processing drum. If during the process the drum starts leaking chemistry, causing it to
build up in the area underneath, a contamination is occurring in side the drum. One
chemical is being loaded on top the previous solution, causing the newly loaded chemical
to weaken . If this condition occurs, the processed film will almost always come out light
or magenta. (When operating a SuperSideKick, this step is not necessary)
Check to document on "Flooding at
Drum" to correct this problem
3. If your temperature is correct, remix developer
Back